Technicolor 3-strip 2004
In order to get this thing out of my head, I needed to attempt to figure out Rob Legato's1 process for creating his version of Technicolor IV and III for The Aviator, what he called Technicolor 3-strip and 2-strip.
The Technicolor 3-strip process sounds simple. Extract the Red, Green and Blue channels using filters, record on monochrome stock, dye each a corresponding colour (Yellow, Cyan and Magenta) and recombine them. All this was originally done using a photochemical/dye printing process. With digital, we can do all this with compositing or even in Photoshop. But in digital the process is lossless and exact. Extracting a pure red, green and blue, making it monochrome, and dyeing it yellow, cyan and magenta means that nothing would change; the end result would look exactly like the original, and not like the vivid and rich colours of a Technicolor print.
Rob Legato's idea was that there must be something special in the filtering process, something that extracts a more pure red, green and blue. So he created a filtering method to enhance the colour density and then recombined the result.
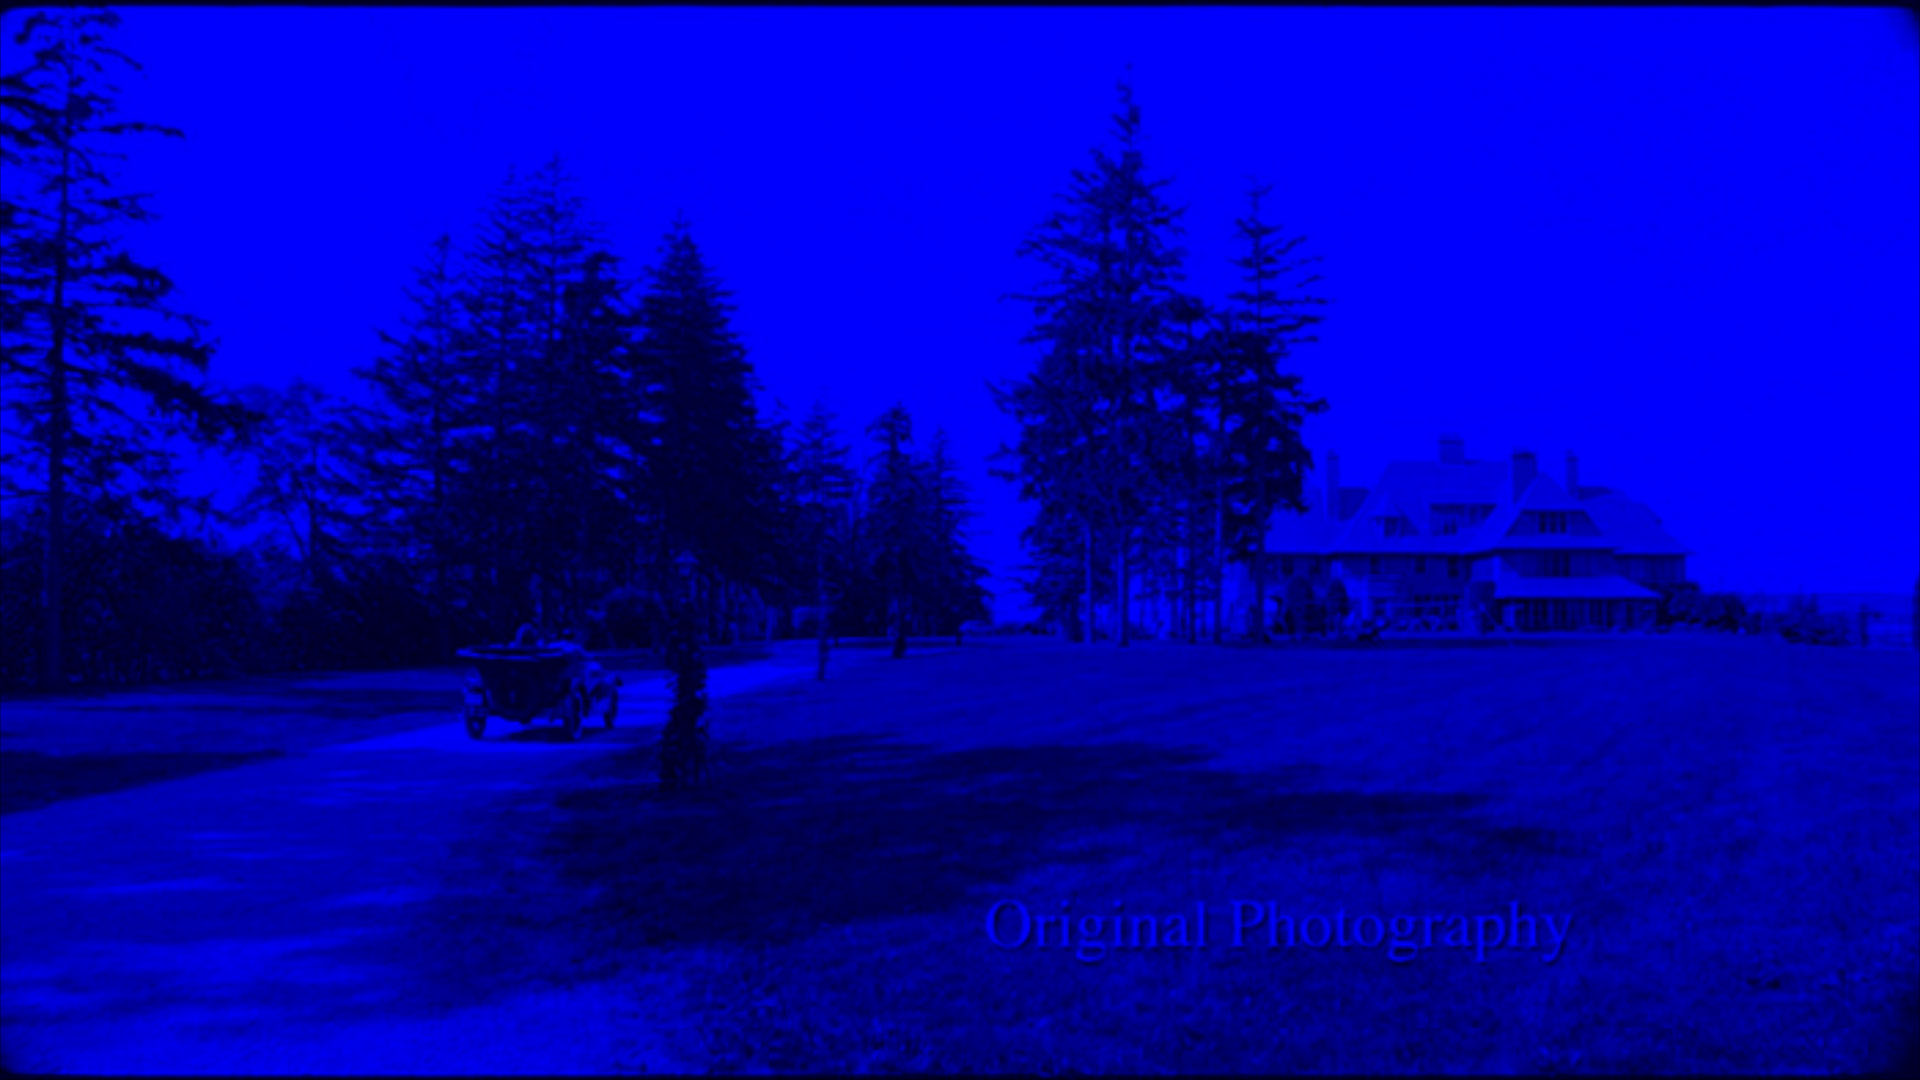
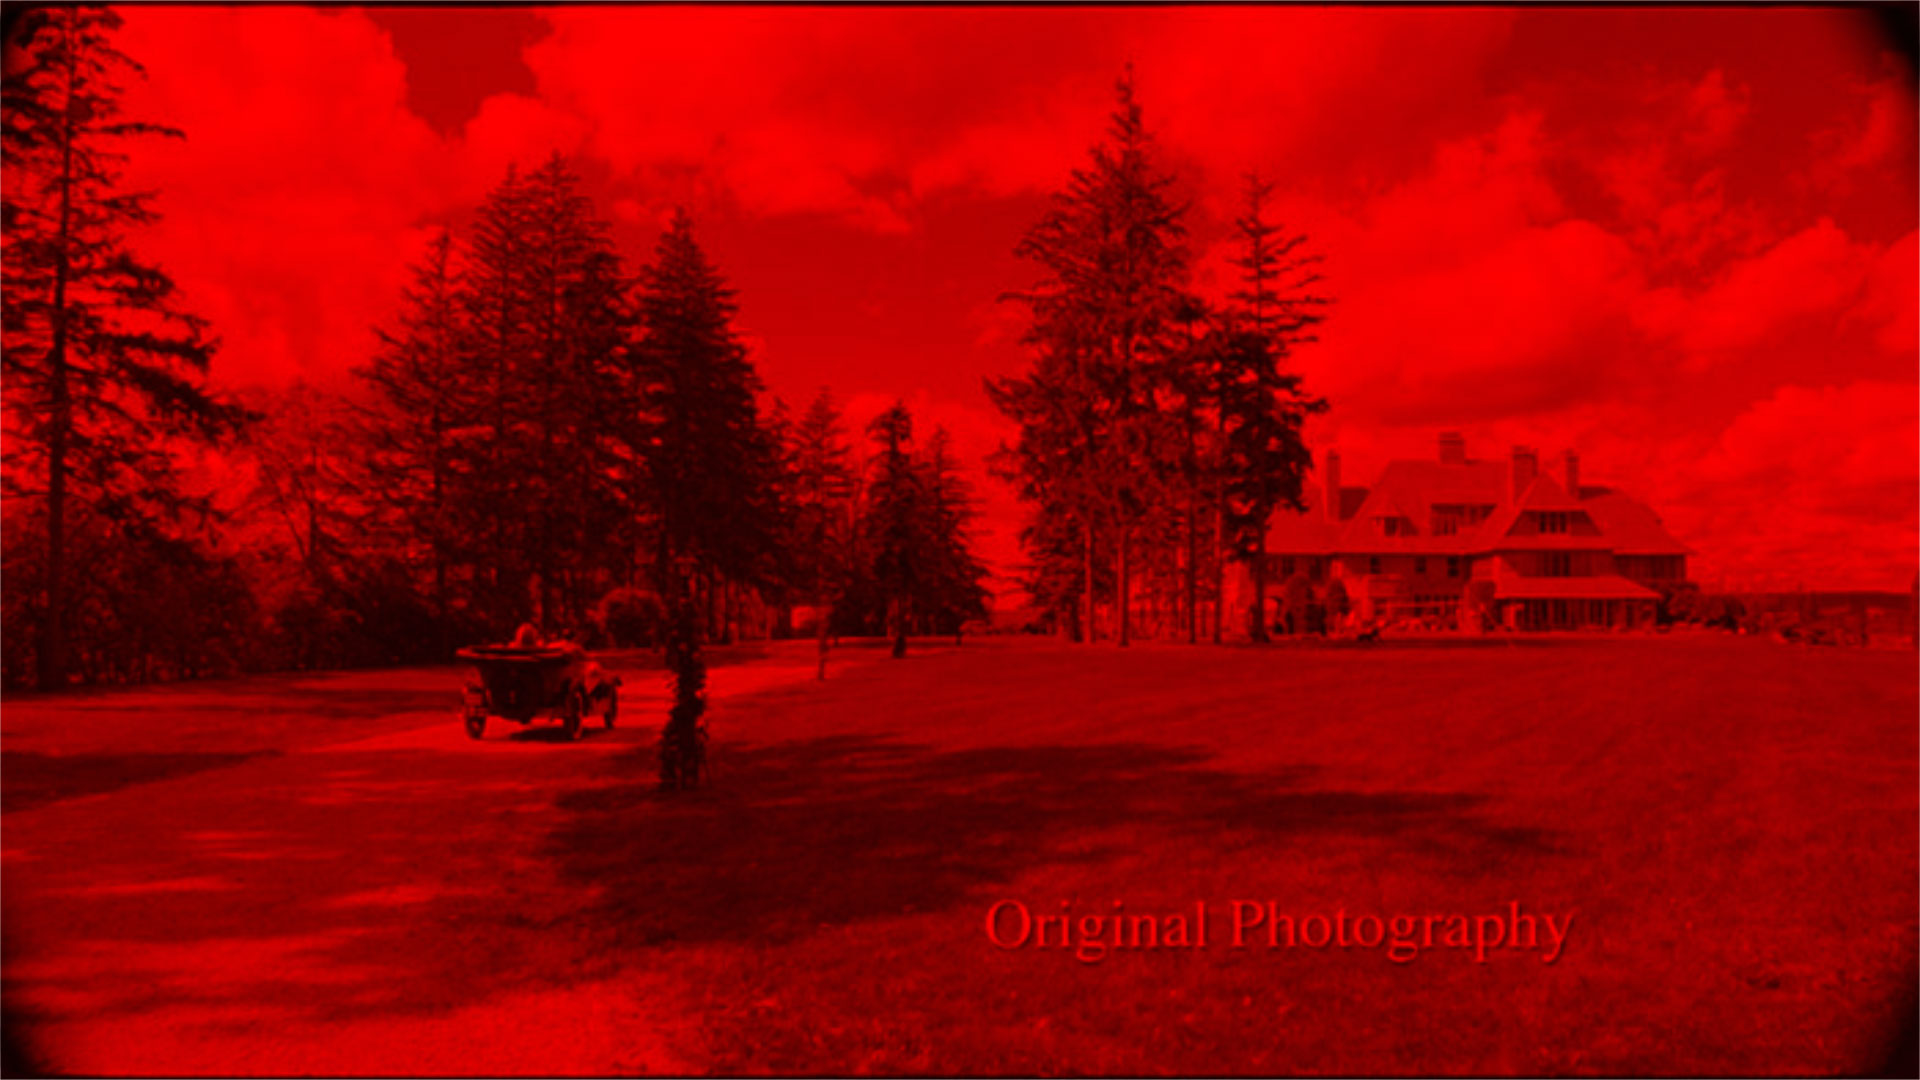
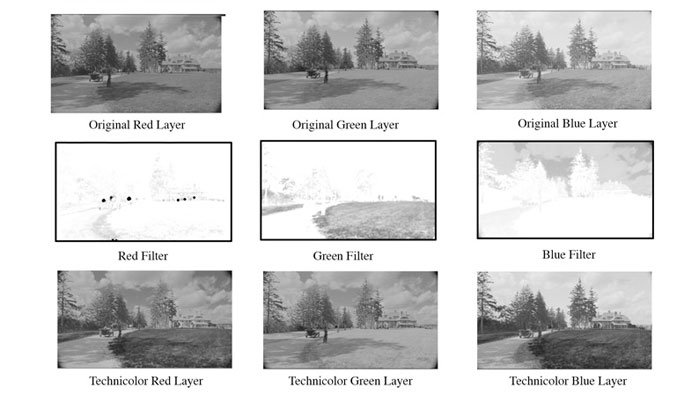 Rob Legato's technicolor 3-strip process, from AVIATOR VISUAL EFFECTS - BEHIND THE SCENES [archive]
The post 1934 color treatment became the 3-Strip Technicolor look created (see photographs on page 10) by imitating the quality the red, green and blue layers have when originally photographed in black and white with the very discerning Technicolor deep red, green and blue filters on the camera lens. Our less discerning modern monopack films create crosstalk between the layers and cannot totally reproduce the pure primary colors the less flexible Technicolor method could afford.2
A number of people have attempted to recreate The Aviator's process,3 and their methods usually involved extracting red, green and blue colour channels, or a gradient map of those colour channels, subtracting colour channels from each other to create a filter, adding or multiplying that filter to a colour channel and then recombining the channels to crete the final image. Here's a typical formula for a channel filter for the blue channel, from Patrick Sheffield:
FinalB = B * Inverse(2G - (B + R)) * (2R - (B + G))
I've tried this method and variations on it and it's pretty close. I did it with monochromes of the colour channels, an add blending mode for the combines and a subtractive blending mode for the subtracts. The results I got were close, but pretty chunky, with loads of macroblocking from less than 4:4:4 colour sources (like the sample JPEG) from the aviator web site. And no matter what I tried, the colour was never as intense, and the filters I made with this method never had the same density or the right areas of density as Legato's filters.
So, I had to go back to the source and re-examine what he did. He left plenty of clues behind, that I could find which were:
- The AVIATOR VISUAL EFFECTS - BEHIND THE SCENES (archive) web site, where he describes creating the filters and adding them to the original channels,
- This article in the Janurary, 2005 issue of American Cinematographer, where he describes using After Effects and Photoshop for his process and building a Look Up Table (LUT) for 3 and 2-strip,
- This video, from the AVIATOR VISUAL EFFECTS - BEHIND THE SCENES (archive) web site, which maps out all the filters and combinations of his process:
The Process
The video shows four steps:
- separate into red, green and blue channels,
- build matte filters for each colour,
- filter the colour channels with their opposing matte filters, e.g, red channel with green and blue mattes, to create new colour layers, and
- combine the new colour layers to create the 3-strip look.
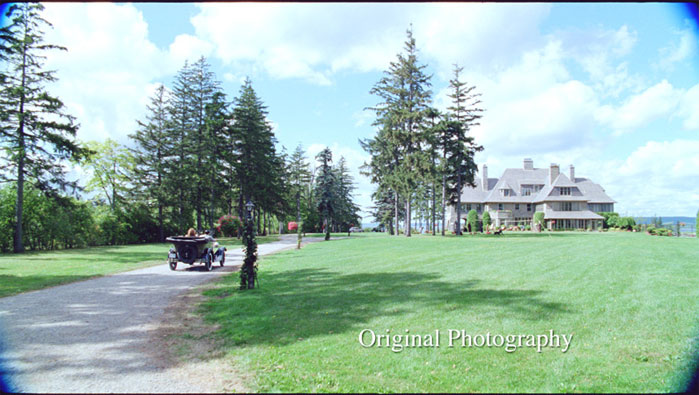
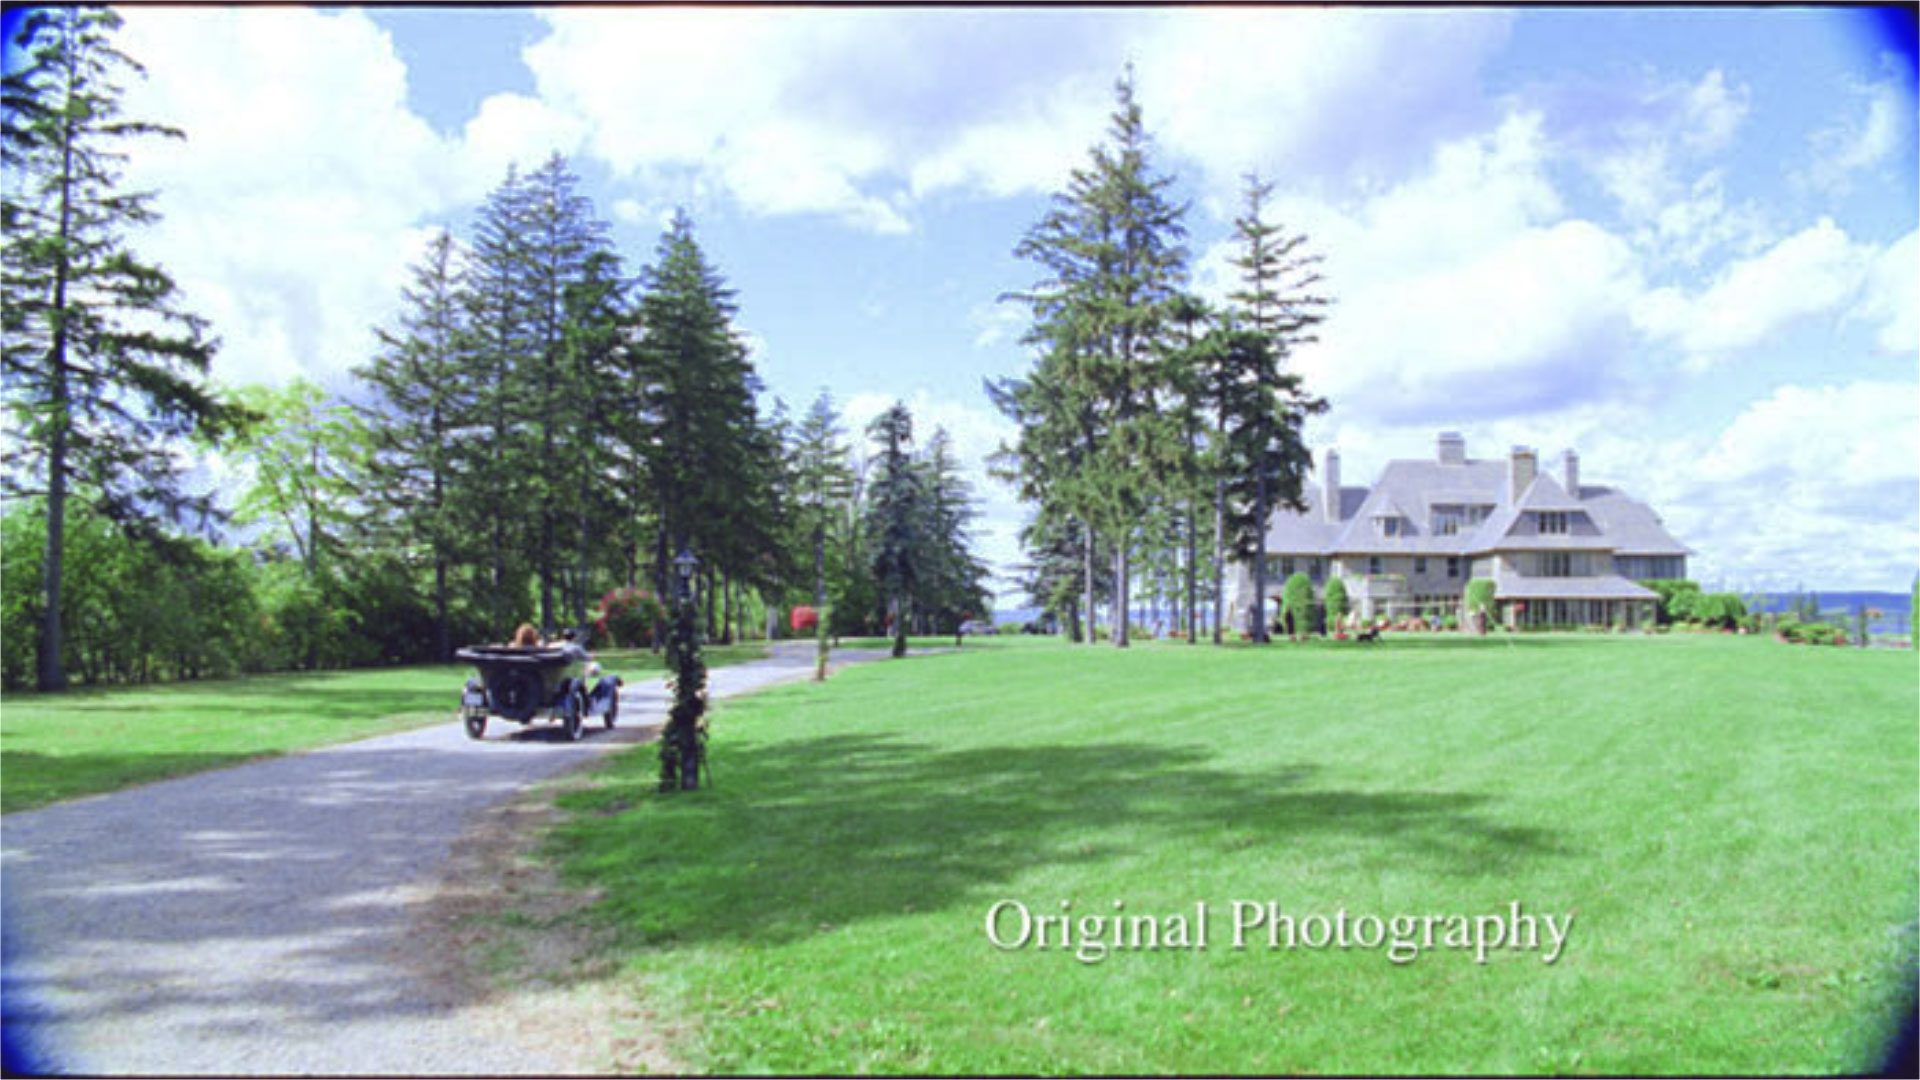
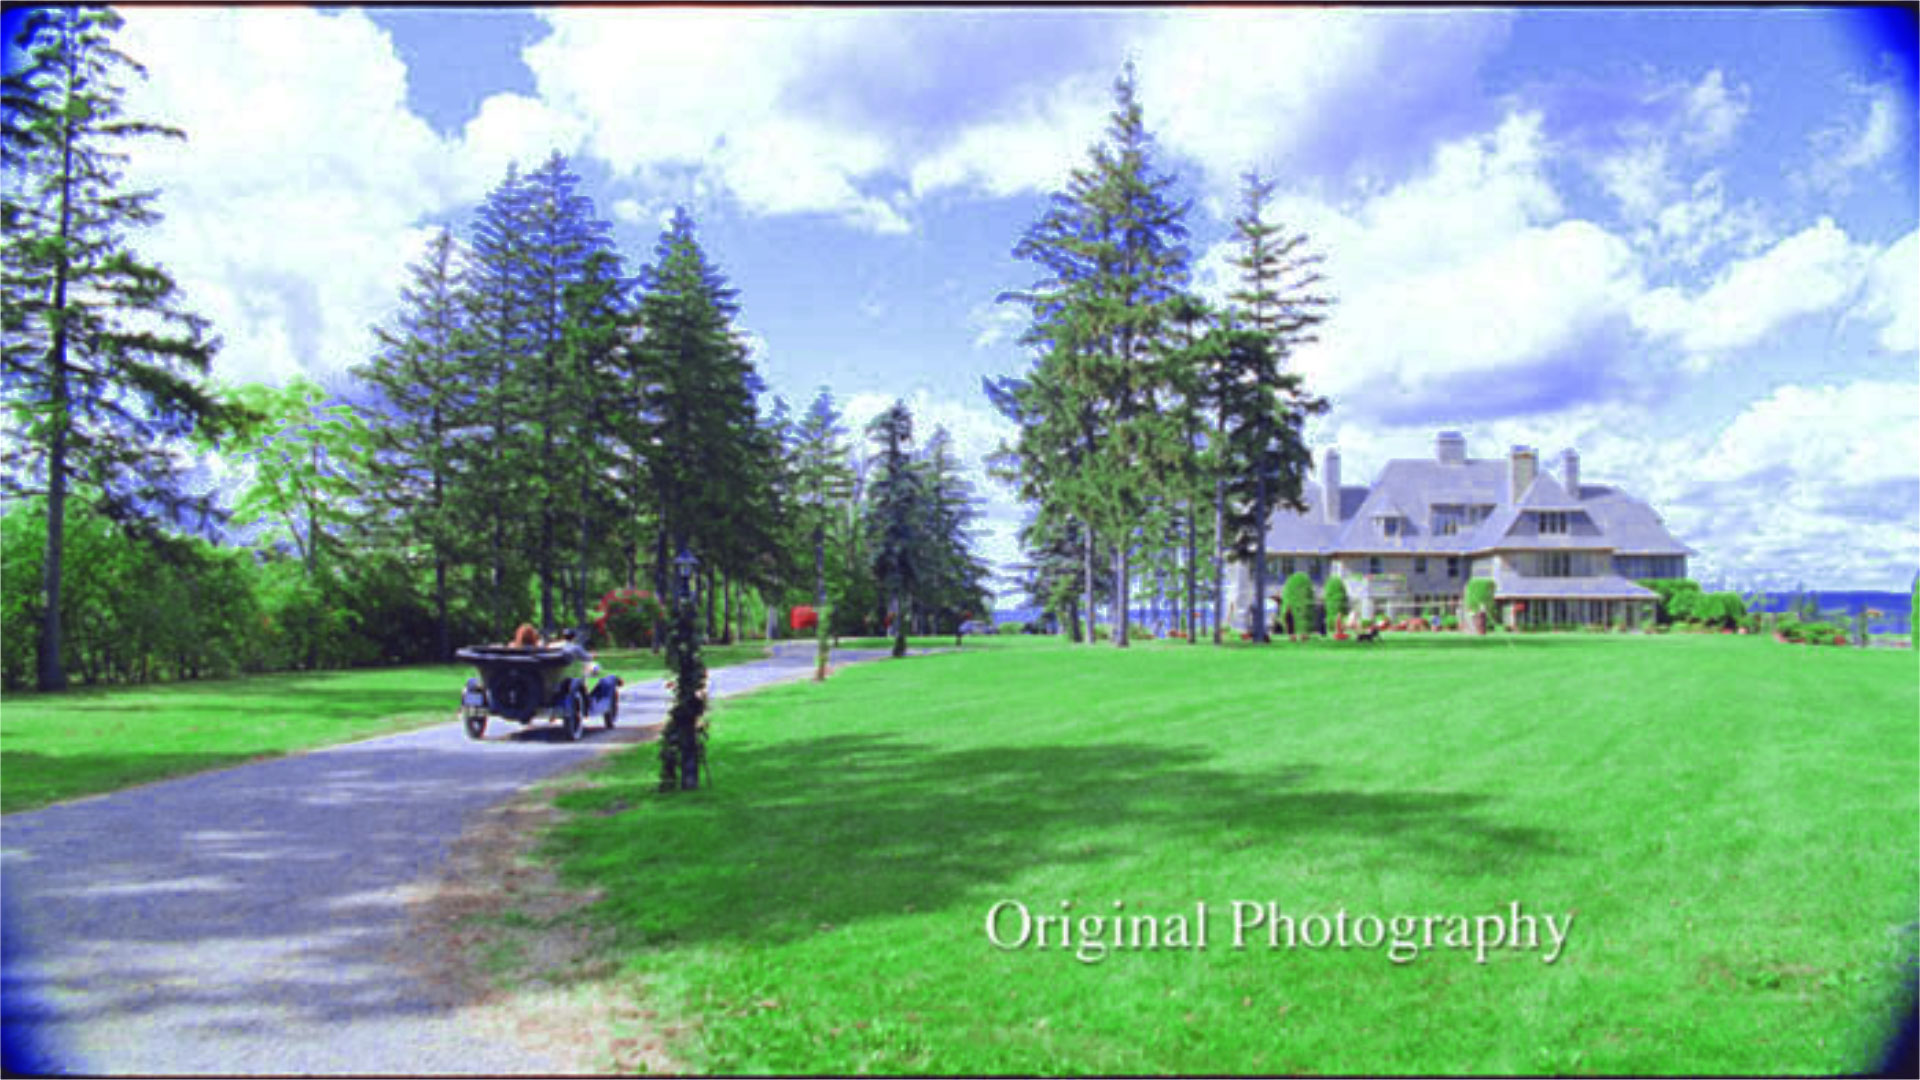
With all that information, it should be easy, right? To duplicate his process, I'll use After Effects (because what he did is so specific to After Effects) and try it with the sample image of the car driving to the house.
Separations
Separations are pretty easy. I made three comps with the source, and used the curves effect to isolate the channels, zeroing the white level on the unneeded colour channels, i.e., for red, set the green and blue channels to a flat curve.

Matte Filters
The matte filters are where all the magic happens and are a bit more tricky to figure out. This is where most people did the equation thing, multiplying channels or monochromes of the channels, subtracting channels, etcetera, etcetera.
Take a close look at the colour channel filters from The Aviator visual effects page. Those Red, Green and Blue filters look an awful lot like a matte from a chroma key, do they not? So let's try it.
Take the Source image again, in a new comp (call it Red Matte Filter) and add a chroma key. I used Keylight, because it's included in After Effects and does a pretty good job. I set the key screen colour to... red for the red matte. Just pure red, all 255 units of it in 8-bit (or all 1 of it in 32-bit). Done. I didn't even adjust the Gain to Balance settings. And for the screen matte, I set the view to... Screen Matte.
The result looks pretty much like Rob Legato's.
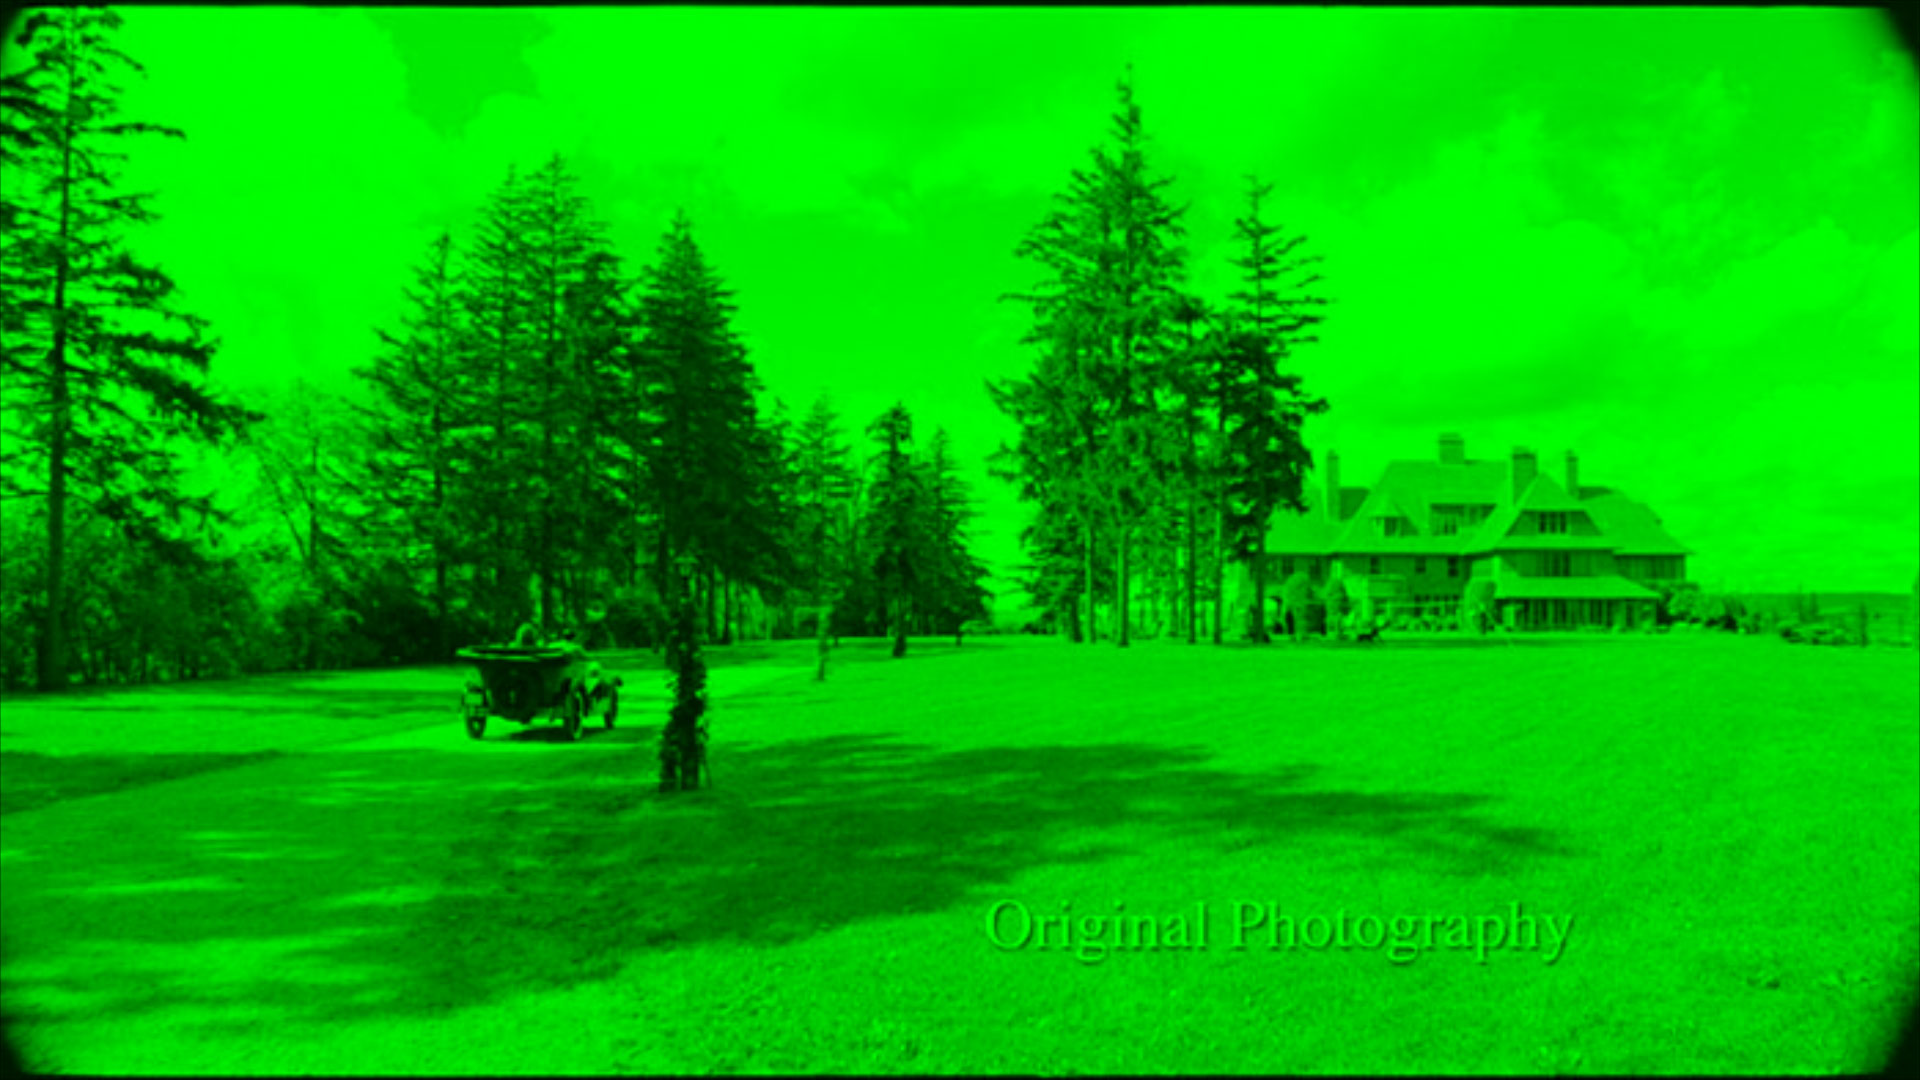
 Green channel matte filter, because the green in this image illustrates better.
It's pretty close, so I think it's on the right track. What it does is maps out all the pure-red areas from the source image, thinks like the red building and the browns in the edge of the road. The only thing is, Legato's red matte had darker areas where there is pure red. You can fix it by adjust the screen gain to about 125 or so to match the samples from The Aviator's workflow diagram. But I'm going to leave mine at 100, because I find the end result too cartoonish.
So, if you do the same for Red, Green and Blue you get:
 Red
Red
Green
 Blue
Blue
Filtering
Now that we have the mattes, we'll use them to filter out the "crosstalk" colour. Legato's idea was that the Technicolor IV camera's filters were more discerning, so he needed to take out the areas (matte out) of the pure colours from the other colour channels.
Doing it is pretty easy. Make a new comp for each colour channel, and multiply the other colour channel's matte filters onto the original colour channel. So, following our example of green, take the green channel,
Layer in the red and blue matte filters and use a multiply blending mode,
Red Matte Filter
Blue Matte Filter
and you get the New Green Layer.
 New Green Layer. Note the darker sky from the crosstalk pure blue being filtered out.
And so, applying this process to all the channels, you get:

Combining
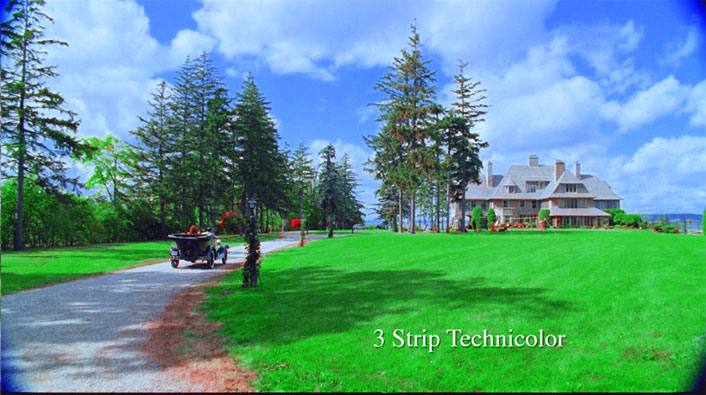
To my surprise, all that you do next is combine the channels. No converting to monochrome, no adding in cyan, magenta, or yellow dyes. Just put them all together in one comp and use an add blending mode (do it in 32-bit float so you don't clip your whites).
The result has the popping reads, the saturated cross and a deeper blue sky. It's not quite as cartoony as Legato's final result.
He might have done a deeper density pass (like my screen gain adjustment) on the screen matte. If I adjust the gain to about 150 to make deeper blacks, I can do this:
It's close, but it's still not quite the same. I have a feeling that on the final film, they did the LUT pass of this effect, and then played in the Davinci. They also were working with sources that were higher fidelity: not JPEG compressed and not put into an sRGB colour space! Look at the sky and see how much more blue they put in, and the hue of the grass is different from the original, not just enhanced with density.
I also think these images from The Aviator VFX site are a bit incorrect. Here's a still from that scene from my DVD:

The clouds aren't as blue and blow out to white more like mine, and there is definitely more yellow in the greens (grass) and less blue in the greys. I kind of feel like my original gain level was more correct, and then the rest was done in the Devinci.
Notes
-
Most references to the Technicolor work done on The Aviator give credit to Rob Legato, the VFX supervisor, for coming up with the process, but like most things, I think it was more complex and a group effort. Take a look at the credits on imdb and see how many people worked on the Technicolor Digital Intermediates: Karen Boyle-Anastasio, Aaron Deneberg, Tony Dustin, Alex Hernandez, Steve Hodge, Brian Kun, Bob Peishel, Joshua Pines, Victor H. Rivera Jr., Kevin Schwab, George Zidd, you all had a hand in this.
-
I believe this thinking was mistaken in overestimating the ability of the Technicolor camera's filters to discern colours. They are no more than the equivalent to Wratten colour filters. I'm guessing what he was told about was the ability of the "silver" dichroic beamsplitter that was updated Technicolor IV cameras in 1952 to pass specific wavelengths of light; the same kind of beamsplitter used in 3 CCD video cameras. See my Technicolor No. IV 1932-1953 silver article.
-
For example Patrick Sheffield made a set of FCP 7 plugins, based on a subtractive formula. hassanvfx did a method based on multiplying and subtracting colour channels.
Published Thursday, February 10, 2022.