All Hail the Mighty HVX200
a guide to squeeing the last of the toothpaste out of the tube
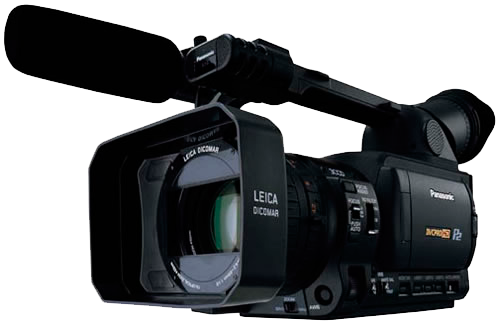
The Panasonic AG-HVX200, the original DV Rebel Cam, part of the first wave of affordable HD camcorders, modeled after the revolutionary DVX100, offered HD 24p at under $10,000 back in 2005. Now, almost 20 years later, is this artifact even useful as a filmmaking tool anymore?
It does have a lot going for it: no rolling shutter, 4:2:2 codec, true 24p as well as 60i, 60p, 30p and variable frame rates down to 2p, a host of tonal controls, dual slots for solid state recording, plus it's a camcorder with real audio inputs, a motorized zoom, built-in ND filters, viewfinder, top handle and a microphone mount. It's a camera built so well, it still has a subreddit.
An HVX200 and a wide angle screwed onto the front is still the weapon of choice for gathering skateboarder footy. It's the little sibling to the original Varicam (27H), and Panasonic packed a lot of punch into a small package. The camera can be made to do almost any kind of look in-camera with it's almost too large pallete of settings. With all that choice and years of advice, the questions are still being asked: how can I do X with all these settings? How can I get the most (dynamic range) out of this camera? What are the best settings?
I've had a love/hate relationship with this camera. Like any powerful pro level camera, it's a bit of a beast to handle. A bit of history lesson: back in the 80's an 90's a production crew included an engineer who's job it was to set up and wrangle camera settings. In the 2000's and 2010's that job became the videographer/cinematographer. Add on to that the translation of film to digital video with a shift of thinking about film response compared to a digital imager's response, plus the ability to tweak anything in-camera – even the pros had a hard time understanding how to master these tools.
So, let's get to it. I think the HVX200 is still a useable tool. The perfect tool for what you need? Maybe not. It's a maybe 1080p camera at best, without the ability to shoot log. It's noisy, like really noisy. It's 960x540 CCD imagers' output looks soft compared to crisp 4k CMOS. It has 1/3 inch sensors, so you won't get the shallow depth of field of a full frame sensor. Because of it's noise, the low-light capabilities are crap. So why would anyone shoot on this relic today?
I would. And I do. And I'll show you how to deal with all these limitations.
Back in the Day
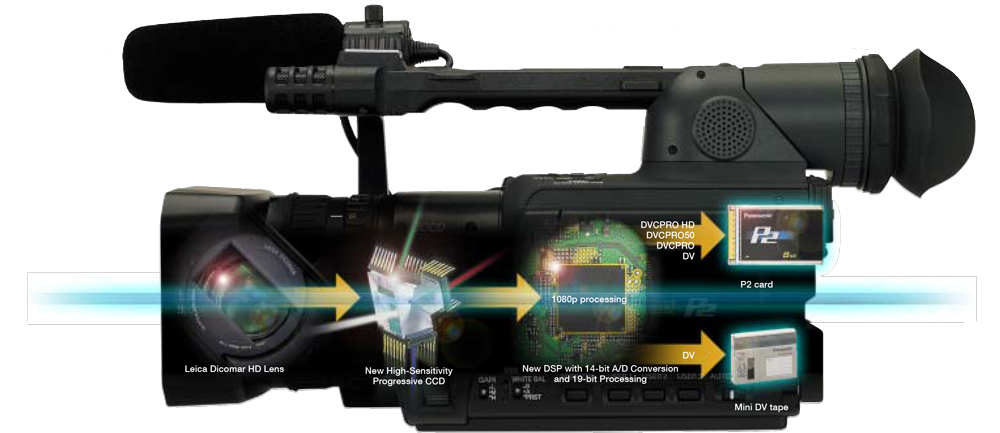
What was the big deal with this camera anyway? Back in 2005, it offered:
- Real progressive images at 24 frames per second – just like film. It's competition offered faux 24p, like the Sony Z1 Cineframe 24 or the Canon XL H1's 24f that deinterlaced in camera. The HVX's 24p was the real deal. Even the 5D Mark II didn't come with 24p until a firmware update a year and a half after it was released!
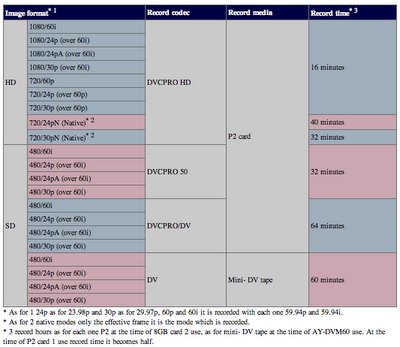
- Not only did it shoot 24p in 60i in two formats: 24p and 24pa (a for advanced with full progressive frames in a 60i stream), it also shot in 720 24p native. This was unheard of at the time, and only worked because it used solid state recording. 720 24pn as it was called, only recorded the 24 frames per second it needed, not the extra frames to needed fit for a tape-based 60i recording.
- The HD format was DVCProHD, with spacial 6.7:1 DV compression at 100 Mbits/second; compared to HDV's long-GOP MPEG-2 temporal compression 19 Mbits/second. Even the later Sony XDCam of the EX1 and EX3 only went up to 25 Mbit/second.
- Panasonic colour. There is something about Panasonic's CCD's that are magical. To quote Adam Wilt:
While the HVX200 doesn’t have quite the dynamic range nor the tweakability of the EX1, it still has Panasonic’s gorgeous Cine Gammas with great highlight handling, and naturalistic color rendition that many shooters prize. I can tweak the EX1 to get colors similar to the HVX’s, but I have to tweak the Sony to get there: the Panasonic just looks that way to begin with. And even the Panasonic’s comparatively limited menus give you a broad spectrum of looks.
- Solid state recording. In 2005, I was shooting on tape, mostly miniDV tape. As much as I loved the ability to shoot and then just store it on a shelf like a book, I can't tell you how many times I have lost footage due to dropout, moisture, head buildup, brand of tape weirdness or the tape degrading over time. Tape was awful. Solid state was a revolution. We just didn't know it at the time.
- HD. Standard def DV25 was the Betacam of the digital age and we all thought it was amazing. Films were shot on it. HD was the 4K of it's day and looked absolutely stunning. HD seemed so sharp that even Industrial Light and Magic had to up their model making skills on Attack of the Clones because HD showed too much detail.
Alright, enough of this old-man back-in-my-day crap.
Challenges of this beast
The 3 main problems:
- Resolution
- Noise
- Dynamic Range
The 3 main problems:
- Resolution
- Noise
- Dynamic Range
These three problems are interrelated. To get more resolution, you might increase sharpening for better perceived resolution, which leads to more noise being sharpened as well, and a higher perception of noise. More noise decreases the dark end of the camera's tonal and dynamic range, turning greys and blacks into noisy mush. You could add to this the challenge of shooting in low light. Bumping up the gain, or using a gamma profile like high to target shadows adds in more noise, decreasing the useable dynamic range and adds in a lot more noise.
The result is: soft images, fighting for a correct exposure while preserving highlights, sometimes too dark images, with too much noise. You get footage like this in an edit bay, you start denoising, adding sharpness and correcting for tonal issues, and you can end up with a mushy compromised mess.
In digital, there have been two ways of shooting:
- get the shot the way you want in camera. Typically done when a camera shoots in a limited colour space and with a limited dynamic range, especially with early digital cameras shooting REC. 709 or DSLR shooting in 8-bit, or
- make a digital negative and get the shot you want in post. Done by shooting in a LOG colour space, or attempted by shooting "flat".
1) gives you the ability to shoot and walk away with great footage, or present great footage to a client (and the ability to see what you're going to get if you have a trusted monitor on set). 2) gives you the ability to collect the most amount of information you can during a shoot and endlessly tweak and massage your footage in post. Moving towards 2) has been the trend for productions with cameras that can shoot 10 or more bit LOG, 4:4:4 encoding, RAW, larger drives, and faster computers for post processing. 2) has typically become more expensive.
Both methods are completely legit ways of making images and I've seen great films shot both ways. Both have risks, but the difference really is: when do you want to make your image making decisions? During the shoot or after? When is the best place to do the processing, using the camera's processing or your edit/VFX/colour bay computers' processing?
Typically 2) has been the suggested way of getting the most out of the HVX200. Shoot in a Cinegamma, turn off all the sharpening, collect as much dynamic range as you can, and do a ton of work in post to get the image you want, and struggle against the limitations of what this camera can and can't do.
Resolution
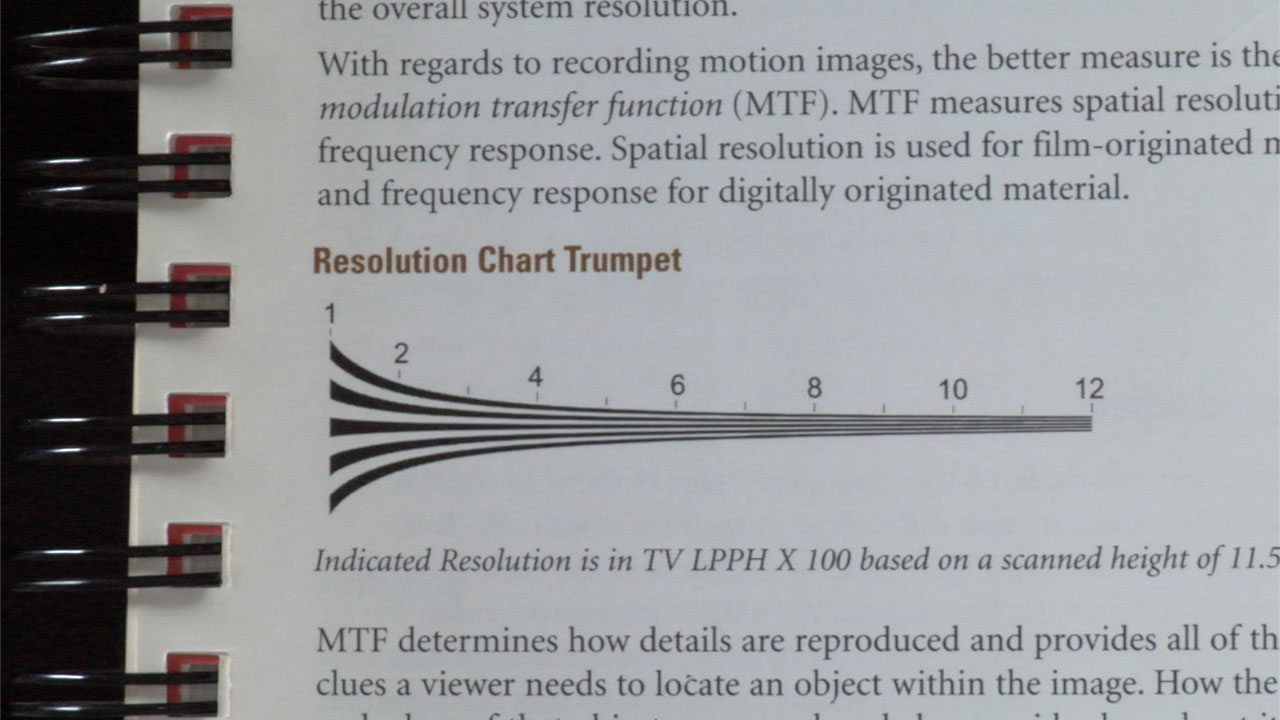
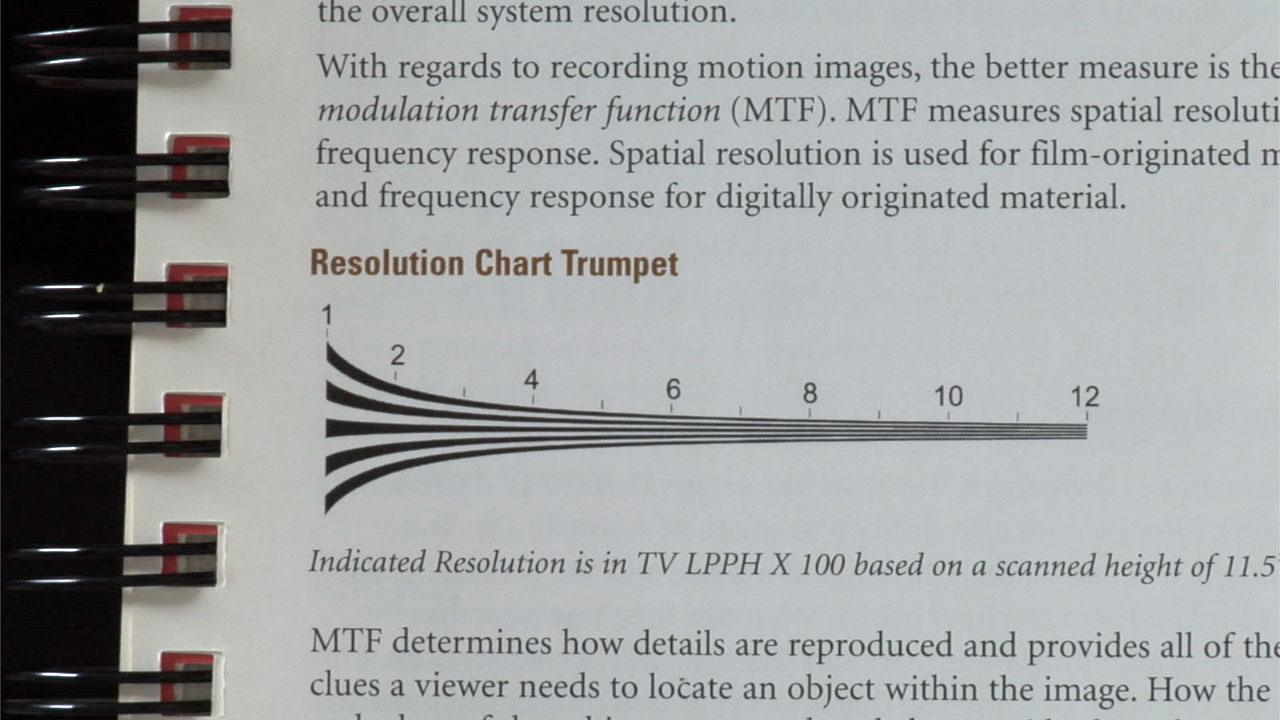
Adam Wilt did some great testing for resolution during the Texas Shootout and observed this:
The HVX200 shoots both 1080- and 720-line formats, and it's sharper in 1080. While its resolution is only 540x540 (TV lines per picture height horizontally x TV lines vertically), the 1080-line recording preserves more of that resolution.720p recording uses 960 samples/scanline, so filtering for recording causes detail near 540 TVl/ph to be diminished, whereas 1280-sample recording in 1080-line modes has a cutoff at 720 TVl/ph: 1080-line images show no graying-out of detail at all: the images retain considerable contrast at 540 lines, simply switching into aliasing at that point. Displayed on a 1080p monitor, scaled-up 720 images look a bit softer--although on a 720p display, there's little difference aside from the grayed-out area at 540 lines on the vertical resolution trumpets.
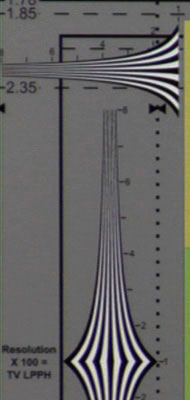
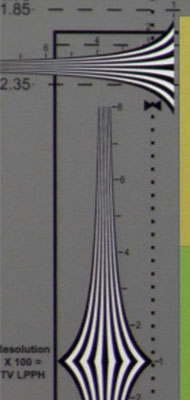
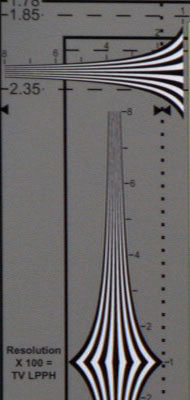
The HVX-200 1080 image has been scaled down for comparison. As you can see, there's barely any difference in real resolution. It all falls off just after the 500 line mark on both the horizontal and vertical trumpets. Adam Wilt's results:
| HVX-200 resolution | |||
|---|---|---|---|
| camera/mode | CCD pixels, HxV | luma sampling, HxV | H res xV res |
| HVX-200 720p | 960x540 | 960x720 | 540x540 |
| HVX-200 1080p | 960x540 | 1280x1080 | 540x540 |
| AJ-HDC27H 720p | 1280x720 | 960x720 | 540x700+ |
Do you see more detail in the HVX-200 1080p vertical trumpet? Art Adams explains:
Both DVCPROHD cameras cut off at 540 TLl/ph, the limits of DVCPROHD's 720p sampling. However, the HVX200's charts show aliased detail well past that point, whereas the higher-resolution--but better filtered--Varicam shows more uniform gray areas in both resolution trumpets and multiburst patches beyond 540 lines. A naive observer might think that the HVX is able to render higher resolutions, based on visible chart detail, but that detail is really a spurious lower-frequency aliasing artifact ("Aliasing in Detail", DV Magazine, June 2006).
Four things limit the resolution: the sample limits of DVCProHD, the sensor, the image processing and the output resolution (720p or 1080p). Panasonic claims the Spacial Offset design of bumping the green CCD off by a 1/2 has a theoretical best case resolution of 1440 x 810 pixels. That may be so, but real world testing shows that the camera's images tend to be soft.
So what does one do to get the more resolution out of the camera? Nothing. You can't. Sure, shooting at 1080p might eke out a wee bit more resolution, but it's not much.
Say it with me: It's a 720p camera. But so was the Varicam 27H, and it made great images.
The question we should be asking is: How do we preserve the resolution we have with this camera, and make great images?
Shooting Flat to get a digital negative would say: turn off everything you can for the minimal amount of camera processing. For resolution that would mean turn off all sharpening. There are two sharpen functions in the menu: Detail Level and Vertical Detail. Both with a range of -7 to +7.
That's precisely what Art Adams did on his Texas Shootout tests. Look at the left two trumpets again, both were shot at -7 detail and you can see the image suffers for it, especially on the text. Clearly, you're going to be sharpening the image at some point, either in camera or in post.
I'm going to go against doctrine and propose that you do your sharpening in camera, regardless of if you're shooting for a digital negative or if you just want to get it right in camera, because the camera has a firehose of an image processor, and the images you're making will never be at a higher resolution than in the camera's internal imaging pipeline.
Would you rather do your sharpening in 1080p? With a 19-bit DSP? Working with uncompressed (off 3 RGB filtered sensors, spatially offset, giving you 1440 x 810 progressive resolution, before it gets mangled by a compressed 960x720 or 1280x1080 DVCProHD codec? I would.
The images off the spacial offset sensonrs needs a bit of sharpening. -7 might be turning it all off, but there's a lot that the 19-bit DSP does in building the image, and adding a little bit of sharpening helps define the image before you start seeing over sharpening and halos. And I would say my tests back up the theory. To my eyes, the camera does put out a better image with a bit of sharpening than I can do by massaging the image to death post on -7 sharpening.
Even Art Adams agrees. He took another look at the camera a few months later and did more testing for DV magazine:
In Texas, we used -7 (detail off) and the image suffered for it. Set detail to +7, and everything picks up harsh edges. I usually use -2, which crispens the picture without adding too many objectionable outlines and halos, but others (for example, DP Chris Oben; see www.chrisoben.com/hvx200article.htm) opt for higher settings like +2.
Sharpening is a subjective thing and like salting your food, can be easily over done. If you're going to do your own tests, use a monitor, hopefully the one or one close to the size your final output will be viewed on. Be aware, the camera has a difference of sharpening between the Cine gammas and the non-cine gammas. From Art Adams:
While repeatedly going back and forth between settings, I discovered that the Cinelike gammas have roughly half as much enhancement applied for any given detail setting as non-Cinelike gammas do. A detail setting of 0 in Cinelike gammas is roughly the same as -3 in other gammas; +2 in Cine gammas is like -2 otherwise (hence Chris Oben's +2 in Cinelike D is about as "sharp" as my -2 in HD Norm); +7 Cine roughly matches 0 non-Cine. I've owned the flippin' camera for several months and never noticed this until now... is my face red!
For non-Cine gammas, Art Adams recommends -2 is a good compromise between sharpness and excessive edge detail (i.e., some haloing that you want in a final output) but also recommends values as low as -3 to -6 depending on the scene. The BBC's evaluation recommends -2 for non-Cine but also as low as -4 for a film out (with non-Cine gamma). They admit as well:
The settings given in Section 1 are not ideal; they are subjectively a reasonable compromise, but overall performance of the camera is not a good match to other HDTV cameras in this respect.
And therein lies the problem and the reason why sometimes you just want to chuck this damn thing. What is right? How do you get more out of this camera?
I say, embrace what it can do, and make great shots with it. I say forget what other cameras can do. The camera you have in your hand is the one that is your tool. Master it.
There is some confusion about how detail sharpening works on this camera. There are two controls, Detail Level and Vertical Detail. Barry Green describes Vertical Detail as a fine control. Goodman's Guide to the Varicam offers a bit more detail:
[Vertical Detail] adjusts the detail gain which enhances the horizontal details. Lower numbers indicate less detail enhancement. The value set in MASTER DTL is added or subtracted from the value set here.
These two controls give you complete control over horizontal and vertical sharpening. Set Vertical Detail to 0 (no additional adjustment), then use Detail Level to set your vertical sharpening. Then use Vertical Detail to tune your horizontal sharpening, adding on or subtracting to the value set in Detail Level. Need to go back and tweak? Set Vertical back to 0 and start over again, then reapply Vertical Detail to your new Detail Level value, plus or minus.
Horizontal and Vertical detail sharpening controls are critical because the pixels in DVCProHD are rectangular, not square.
I use different Detail levels for different uses. For Non-Cine gammas and for shooting when I don't want to do additional sharpening, Art Adam's -2 Detail Level (and -2 Vertical) looks good to me. For Non-Cine gammas where I want to manage some post sharpening -4 Detail Level and -4 Vertical Detail looks good, and agrees with BBC's 1080p recommendation.
For everything, set the V. Detail setting to Thin.
For Non-Cine gammas Detail Level -2, Vertical -2 looks nice and soft, leaving room for more later in post, if desired. Detail Level 0, Vertical -2 makes the image really pop, with slight halos, if you don't want to post-sharpen. Detail Level -1, Vertical -2 might be a good compromise between the two.

Don't trust my trumpet chart figures from these tests. I'm only using a faux trumpet from a page in Goodman's Guide, not a real test chart, just to judge edge haloing.
And, as far as the debate over whether to shoot in one of the 1080 progressive variants or in 720p, I choose 720PN. 1080 gives you slightly more resolution, due to the higher res DVCProHD record, but I don't find the tradeoff in recording space worth it. If you shoot 720PN, you only record the frames you want and dramatically increase record time.
Dynamic Range
There are two schools of thought on shooting with this camera for maximum dynamic range and they can be summed up as:
- shoot with CineD for maximum dynamic range
- shoot with a non-cine gamme (like B Press for less noise) and raise master pedestal for more dynamic range
In theory, both are right. CineD gives you the most tonal and dynamic range, bringing in detail from the high end that is normally lost from hard clipping, and brings up the shadow detail into higher bit recording. It's also considered the noisiest gamma profile. B Press compresses down the shadows to suppress where the noise is the worst, but with added knee, you can recover some of the highlight detail.
Compared to a LOG recording camera with a higher dynamic range, both are kind of crap. The Dynamic range of this camera is going to be its dynamic range, and it's about 8 stops, no matter what you do. Cinelike D gamma will give you better highlight handling, and you should use it if you want to but it won't increase the dynamic range by much more than 1/3 of a stop at best.
What has changed in camera sensors since 2005 is noise. Sensors have become way less noisy. Even the direct successors, like the HVX200A and the HPX170 were less noisy. Noise is the real limiter of dynamic range, not more extended highlights. If a sensor has less noise, it can pick up more useable detail in the shadows, and extend it's range into the darks. The HVX200's sensor array can pick up 8 stops of useable detail from clipping (highlights) to it's lowest range. If you could build a sensor that could get 1 more stop into the shadows without it being a noisy mess, you'd have 9 stops. Thus, in building such a sensor, you can rate it at a higher ISO, and then appear to have more highlight range.
No matter what you do, the HVX200 isn't going to get more dynamic range. Changing the gamma, lifting the Master Pedestal, using Knee: you're always going to be trading the quest for more dynamic range with making more awful, image clogging, soul destroying noise.
So, forget extending the highlights. Climb down to the shadows and fight the noise.
Noise
Noise is a problem for all digital cameras. Film had grain, which was wonderful, random and added texture. Digital has noise, that ugly dither dance that distracts from the image.
Noise comes in three types:
- Readout,
- Fixed pattern, and
- Photon noise.
Readout noise shows up as big coloured blocks and comes from inconsistent performance of photosite amplifiers on the imager, sometimes due to electrical interference. Fixed Pattern noise comes from photosite pixel variation from the average dark (no) signal. It's commonly caused by changes in heat, which is why a DSLR or a Canon R5 had a time limit on recording that auto-annoyingly shuts off in the middle of your shot. Photon noise is due to the random variations in photon intensity striking the photosite. It's physics and the imager tries it's best to work the averages to even it out, but there is only so much to be done.
The first two types of noise are the ones we can deal with easily. For readout noise, keep your camera away from electronic interference, like set radios and the like. It's not a common issue when using the HVX that a attached microphone or wireless radio interferes, but it could happen.
Black Balance
The single easiest and most important way to take a big chunk out of your camera's noise is to run Auto Black Balance (ABB) and eliminate fixed pattern noise. Fixed pattern noise looks like rough lines across and down the image and is fairly stable. Running ABB takes a black picture of the stable noise pattern and uses it to subtract from each exposure.
On the HVX200:
- Cap the lens.
- Push and hold the AWB button on the front of the camera until you see ABB ACTIVE on the viewfinder. After a few seconds you should see ABB END.
The manual says to do this when you use the camera for the first time, or after it's been unused for a while, when the ambient temperature changes, when you switch to slow shutter or switch between progressive or interlaced modes. Basically, do it before every shoot, after you take a break, at the start of a new day, or any time you go: what the heck is wrong with my camera's picture?
Expose Properly
This camera needs light to overcome the photon noise. Underexposure sucks. Shane Hurlbut, I'm looking at you. This thing is not a film camera and pushing your skin tones towards dark noiseland might saturate them more (as does any shift towards dark in digital), but the loss of image quality will bite you. Use a grey card and the Marker function to adjust exposure to get 50% on your card. For bonus points, evenly light your grey card, get 50% on it and see what f-stop your lens says. Use that info if you want to calculate your ISO and use a lightmeter to assist you for future shots.
Or, use autoexposure if you have to. Just expose well and keep the important stuff like faces out of the noisy shadows!
Don't do what I did for years and underexpose by using ETTR (expose to the right – watching highlights for clipping) to set your exposure. Exposing properly means you're probably going to clip in a lot of real-world settings. Let it. Choose a gamma that clips more elegantly, like Cine V over Cine D. Or control it, but not with your f-stop. Use filters, like a polarizer or a grad filter in a matte box or taped to the front of the lens hood.
Or light for your camera like Colt Seaman did with his GH2, blowing everyone away on the 2012 Zacuto Test (advance the video to about 16:40 to see how he built an image that Francis Coppola said was the most like film). If you have a wide dynamic range situation, use fill light to bump up the shadows and mids to match and then iris down to retain the highlights. As any fill-flash using photographer would tell you, lighting first, then ETTR.
The gammas
Black Press (B Press) gets a lot of hype for being one of the cleanest gammas for low-noise with the HVX200. The thinking is, B Press bends the gamma curve down in the shadows, and bends it up from the mids to highs, essentially applying more of an S-curve. Dropping down the shadows towards black suppresses the perception of the noise.
I find that there is not enough real difference in any of the gammas to make a significant change in noise. There are slight changes in perception, and certainly a difference between the non-cine gammas and Cine D and Cine V, but they are all still noisy as heck. And when you feed that much noise into DVCProHD, you get all kinds of ugly artifacting, like big macroblocks of crud in solid colour areas.
Detail Coring
The third most effective way to deal with noise is using Detail Coring. Detail Coring goes from -2 (off) to +7, and is designed to eliminate detail enhancement on noise. Detail enhancement can't distinguish from very fine details or noise; it sharpens both. Coring lets you select out at what level detail enhancement should be applied. More coring means less noise, but also less fine detail. According to Barry Green in The HPX and HVX Book, Coring is also dependent on how much detail enhancement you apply. More detail level, more coring applied. Goodman, in the Varicam Guide does not describe Coring being related to Detail Level. I don't know who is more correct, but I err on the side of Barry Green and apply Detail Coring after I've set my Detail Levels, which only makes sense really.
I'm trying to eliminate noise, so I set my Detail Coring to +7, and adjust it down if the need arises. Detail Coring +7 smooths out the edges of enhancement on noise quite nicely. And, with the minimum amount of sharpening, doesn't seem to loose too much fine detail, but it is dependent on the shot. +4 Detail Coring might be a better choice, and was the BBC's recommendation, but that allows more... noise.
Gain
Want more noise? Use gain. The higher you electronically push the sensor with gain boost, the more noise will be visible. The temptation is there, because the switch on the side of the camera is so accessible, but gain should be always the last resort in dealing with a low light situation. Instead:
- Add lighting to lift the shadows (if you can).
- Open the aperture (duh).
- Let the shadows go black. For bonus points, use a gamma that crushes the shadows like B.Press.
- Use a gamma like High to gain back the shadows, giving you more tone gradation in the darks. A different strategy, and the opposite of 3. It adds noise, but less noise than adding gain.
- Get a different camera.
- Add gain.
Dropping gain is the all-purpose way of reducing noise. Master Gain on the Varicam could be set to -6dB, dropping the sensitivity by about 2 stops. -3dB was a good compromise in noise/sensitivity. Unfortunately the HVX200 is limited to using 0dB as it's minimum gain.
However, the HVX does have Master Pedestal.
Master pedestal is usually used to get more tonal detail in shadow areas, for building a flat profile (which has it's own dangers). But in the fight for low noise, dropping Master Pedestal can be used as a poor person's Master Gain. It's a total cheat, and not the right thing to do, technically. Drop Master Pedestal to -3 and noise just... smooths out. It's kind of incredible, especially in a Cine gamma like Cine D.
You ride a fine edge here. Too low a Master Pedestal and you crush a lot of shadows into black. But just a bit and the payoff is really good.
Codec
The HVX200's codec, DVCProHD is not really a factor in noise. I ran a test image through DVCProHD compression to see if adding noise would add other artifacts, like macroblocking.
DVCProHD handles noise quite well, probably better than low bitrate MPEG-4. I didn't see any macroblocks or other artifacts generated, but there is detail softening from the compression, probably due to DVCProHD's rectangular 960x720 subsampled pixels.
Summary of Scene File Settings
Designed for lower noise and best resolution.
| For Non-Cine Gamma | |
|---|---|
| Detail level | -2 to -4 |
| Vertical Detail | -2 to -4 |
| Detail Coring | +7 (adjust down) |
| Chroma Level | 0 |
| Chroma Phase | 0 |
| Color Temp | 0 |
| Master Ped | -3 |
| A. Iris level | 0 |
| Gamma | HDNorm, High, B.Press (depending on need) |
| Knee | Mid, High (depending on need) |
| Matrix | Norm |
| Skin tone detail | Off |
| V. Detail freq | Thin |
| For Cine Gamma | |
|---|---|
| Detail level | -2 to 0 |
| Vertical Detail | -2 |
| Detail Coring | +7 (adjust down) |
| Chroma Level | 0 |
| Chroma Phase | 0 |
| Color Temp | 0 |
| Master Ped | -3 |
| A. Iris level | 0 |
| Gamma | Cinelike V or Cinelike D (Cine V clips cleaner) |
| Knee | n/a |
| Matrix | Norm |
| Skin tone detail | Off |
| V. Detail freq | Thin |
Remember: apply Auto Black Balance often!
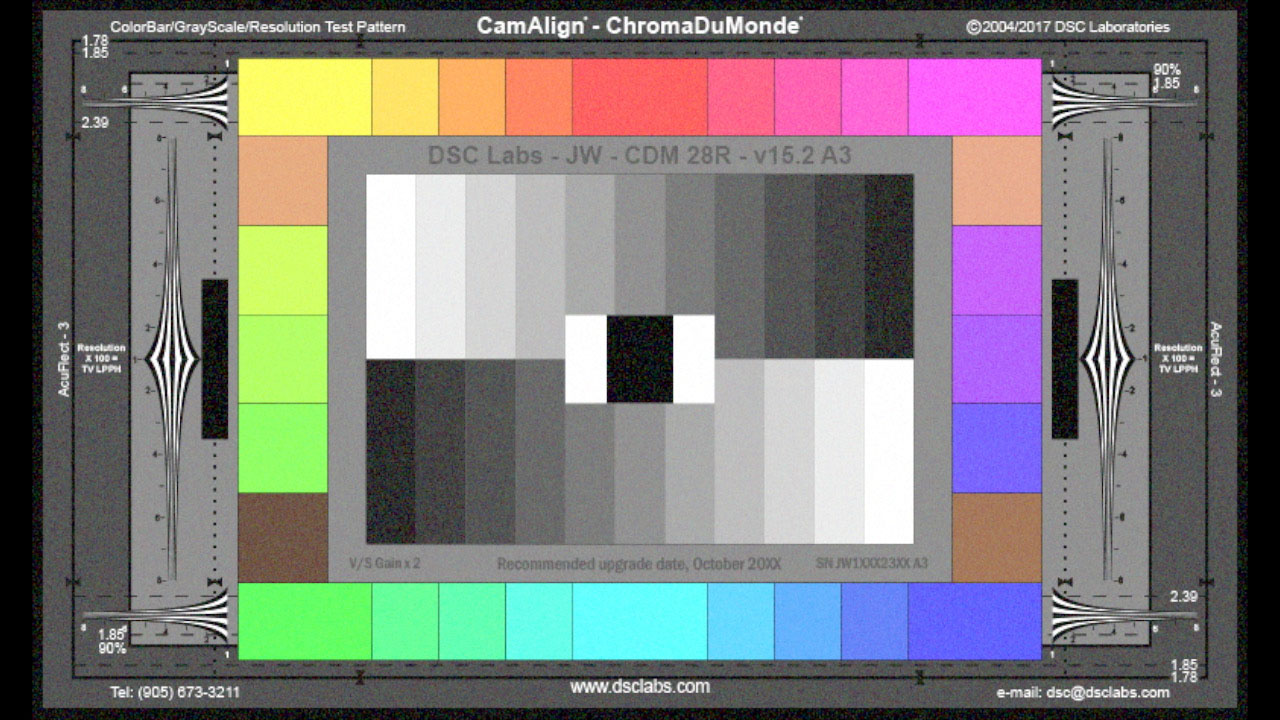
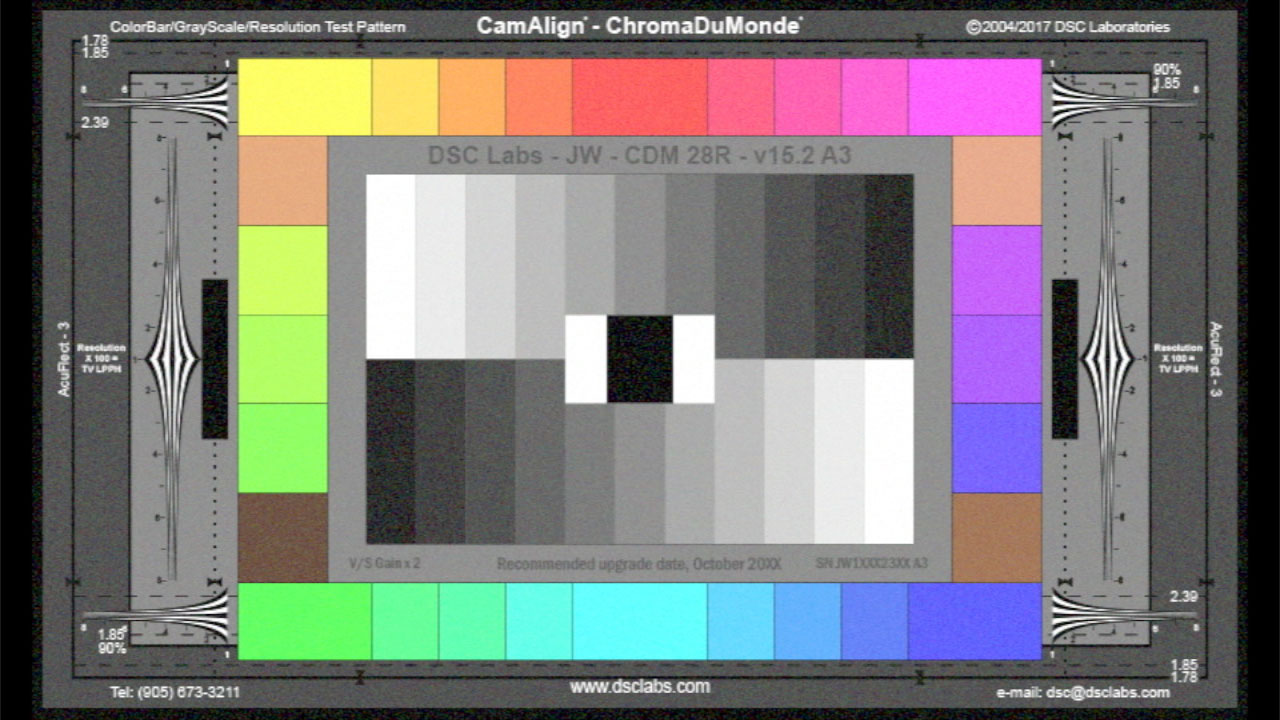
And here is the results of all this finessing, using probably the worst case scenario for a well exposed shot, a big solid block of no detail (the grey card):
Resources
Web
- Panasonic AG-HVX200P Operating Instructions Manual: https://www.manualslib.com/manual/117218/Panasonic-Ag-Hvx200p.html
- Panasonic AG-HVX200 Service Manual: https://elektrotanya.com/panasonic_ag-hvx200.pdf/download.html
- Panasonic AG-HVX200 New Product Information: https://cvp.com/pdf/panasonic_ag-hvx200_leaflet.pdf
- Panasonic's The Invaluable Guide to the AG-HVX200: https://eww.pass.panasonic.co.jp/pro-av/support/content/faq/guidance/hvx200_guide_e.pdf
- Panasonic AG-HVX200 Brochure: https://www.fullcompass.com/common/files/7986-PanasonicAGHVX200Brochure.pdf
- Another Panasonic AG-HVX200 Brochure: https://www.cinematography.net/Manuals/AG-HVX200.pdf
- Panasonic's Design and Development of the AG-HVX200: https://usermanual.wiki/Panasonic/AGHVX200CCDWP.1176706686.pdf
- HD For Indies Latest Info on the HVX200: https://web.archive.org/web/20060312170149/http://www.hdforindies.com/2005/11/latest-info-on-hvx200-1080-res
- BBC's Panasonic HVX 200 assessment and settings: https://tech.ebu.ch/docs/other/WHP034-add18_rev_1_panasonic_hvx200.pdf
- Panasonic's Professional Scene File Settings for the AG-HMC150 (the AVCCam version of the HPX170, and one of the best explanations of how the scene files work): https://eww.pass.panasonic.co.jp/pro-av/support/content/guide/EN/AG-HMC150handbook_e.pdf
- Slapmagazine forum thread on HVX200 Scene Files: https://www.slapmagazine.com/index.php?topic=113746.msg3448028#msg3448028
- Adam Wilt's Four Affordable HD Camcorders Compared, part 1: https://www.adamwilt.com/HD/4cams-part1.html
- Adam Wilt's Four Affordable HD Camcorders Compared, part 2 (The Texas Shootout): https://www.adamwilt.com/HD/4cams-part2.html
- Adam Wilt's Exploring the Panasonic HVX200: https://web.archive.org/web/20070220051402/http://www.dv.com/columns/columns_item.php?articleId=193001363
- Adam Wilt's Whiter the HVX 200?: https://www.provideocoalition.com/whither_the_hvx200/
- Chris Oben's Discovering the HVX200: https://web.archive.org/web/20070303110722/http://www.chrisoben.com/hvx200article.htm
- Alfonso Parra's Test on the Panasonic HVX 200 camera: http://alfonsoparra.com/images/articulos/investigacion/digital_nohd/pdf/hvx-en.pdf
- Walter Graff's 6GOP HDV/P2 DVCPRO – One Man's Look: http://www.bluesky-web.com/HDVHVX.htm
- Panasonic's HPX170 Evolution: A Story in Three Acts: http://kenstone.net/fcp_homepage/hpx_170_evolution_brockett.html
- Dan Brockett's How To Shoot a Network TV Pilot With the Panasonic HVX-200: http://www.kenstone.net/fcp_homepage/tv_pilot_hvx_200_brockett.html
- J. Matthew Turner's Time-lapse with the Panasonic HVX200: https://jmatthewturner.wordpress.com/2013/09/04/time-lapse-with-the-panasonic-hvx200/
- Redrock Micro's samples (some shot on HVX 200): https://www.redrockmicro.com/samples.html
- Barry Green's Panasonic AG-HVX200 framerate hack: http://panasonic.sixbullets.net/hvx200-framerate-hack.htm
- Shot on What's list of films shot with the Panasonic AG-HVX200: https://shotonwhat.com/cameras/panasonic-ag-hvx200-camera
Books
- Barry Green's The HVX and HPX Book: https://www.goodreads.com/book/show/7540225-the-hvx-and-hpx-book
- Robert M. Goodman's Goodman's Guide Panasonic VariCam: https://www.goodreads.com/book/show/15000516-goodman-s-guide-panasonic-varicam?ref=nav_sb_ss_1_23
Published April 2, 2024.
Permalink to this article.